
Welcome to the 4th Annual
Handmade Holidays Blog Hop!
A few years ago we were looking online for handmade gift ideas and thought it would be great if there was a resource dedicated JUST to handmade gift ideas.
![]()
We’ve gathered over 100 of our creative blogger friends in the craft industry as well as some of our fellow product manufacturers to bring you a plethora of inspiring gift ideas you can make now to give to your friends, family, and colleagues.
Pin and bookmark these ideas for this holiday season and to use throughout the year! Each day of the hop features approximately 30 gift projects and you can “hop” from one blog to another to check them all out.
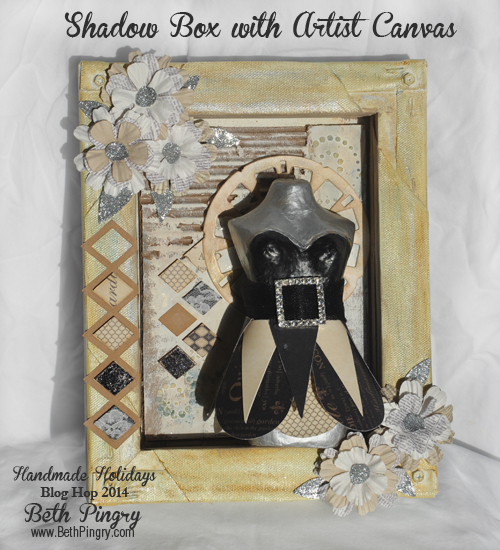
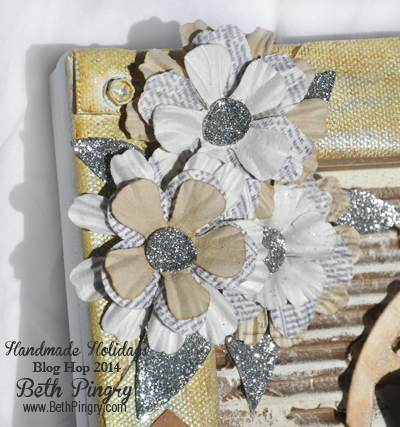
This is my project, a Shadow Box with Artist Canvas.
First, the Supply List: Bold are sponsoring companies, links are below.
- Scrapbook Adhesives by 3L®: Crafty Power Tape, Adhesive Sheets 4×6″, 3D Foam Squares Black Regular, Crafty Foam Tape Black, 3D Foam Leaves, Dodz™ Small, Dodz™ 3D
- Graphic 45: French Country 6×6″ paper pack
- Ellison – Sizzix: Lattice, Picture Wheel, Petal Drop dies
- Buckle Boutique: Couture Embellishment Buckle
- Clearsnap: Swirl Dot Art Screen, Colorbox Fluid Chalk Ink in Toffee, Dark Moss, Chestnut Roan, Copper, Butterscotch, Donna Salazar Mix’d Media Inx Patina, Black Craft Foil, Silver Glitter, Stylus and Tips
- Faber-Castell: Design Memory Craft Gelatos – Yellow, Gold, Blue, Silver
- Plaid: White, Satin Cream, Country Tan, Silver acrylic paint, Black Chalkboard Paint
- Studio 490: White Embossing Paste
- Michaels Stores: 8×10″ Frame 2-Pack, Recollections Flowers
- Misc: cardboard, paper mache bodice, black tulle, lace remnant, screws and screwdriver, sanding tool, black and kraft cardstock
The instructions:
1. Begin with one of the canvases, flip it over to expose the frame, and with a straight edge, make an X from corner to corner. Cut the canvas on the lines with a craft knife.  2. Pull the flaps up and over the sides of the frame, and trim them to the straight edges of the frame. Secure the flaps onto the frame with Crafty Power Tape.
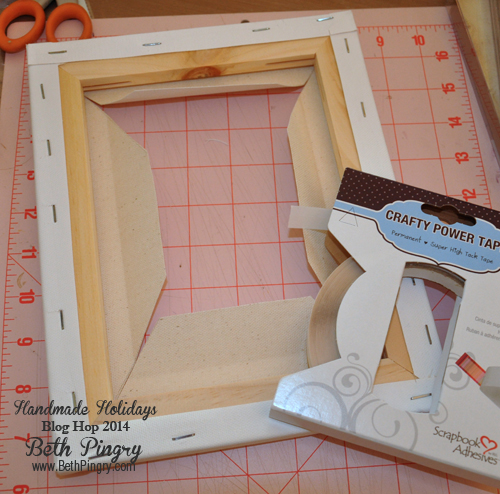
3. Align the open canvas on top of the back side of the 2nd canvas, to create a deep shadow box. I used screws I found in my husband’s workshop, they sit above the top, but I liked the texture and industrial element they added. I used his electric screwdriver to attach the 2 canvases together.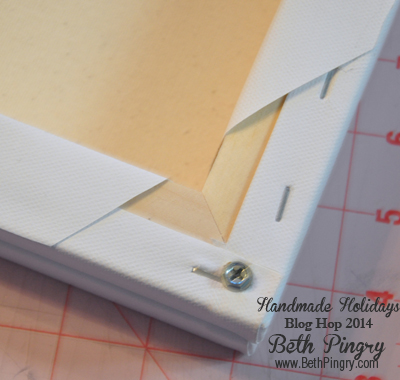
4. Paint the flaps and front and inside of the shadow box white, as a primer coat of paint.
5. Color the outside front with Gelatos, and then rub to the desired finish. I used yellow, gold, silver and blue.
6. For the paper mache bodice, hereby called “the lady”, (note in the photo she is already painted, sometimes I re-purpose older items, and this is one of those times) I first painted with silver, allowed it to dry, then added black chalkboard paint to create the top of her dress.
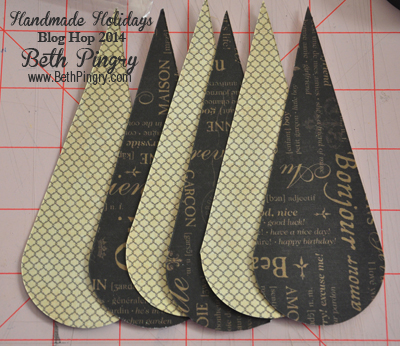
7. For her skirt, I die cut Graphic 45 papers, 2 coordinating patterns, with the Petal Drop die. Sand the edges of the die cuts slightly. Fold them about 1.5 inches down, and arrange them to overlap and wrap around the lady’s waist. Secure with Crafty Power Tape.
8. Thread black tulle through the Buckle Boutique buckle and wrap it around the waist, slightly overlapping the skirt. I used Black Crafty Foam Tape to secure the tulle.
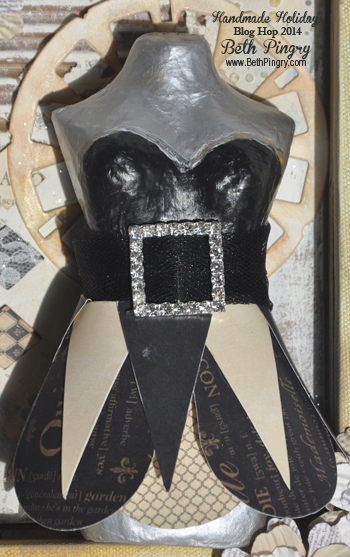
The Finished Dress
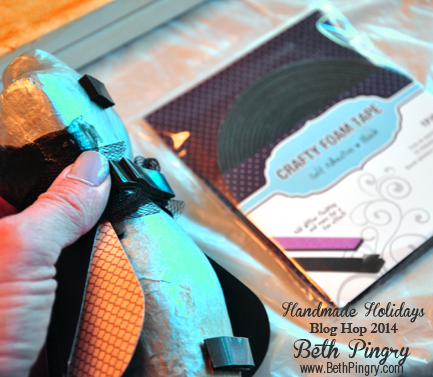
9. I cut Crafty Foam Tape into ½” long strips and layered them on top of each other in a few spots; when I was ready to adhere her to the project, I had the tape in the shallow spots on her back (she’s got some junk in the trunk!) Note: leave the liner paper on the top layer of tape until ready to adhere.
10. Cut cardboard (I used a regular old box) to slightly smaller than the inside opening of the shadow box. Peel some of it to reveal the corrugated texture. Paint part of it white, leaving some of the original box color in random parts. Allow the paint to dry.
11. Using the Clearsnap Art Screen, add texture paste to parts of the cardboard. Allow it to dry.
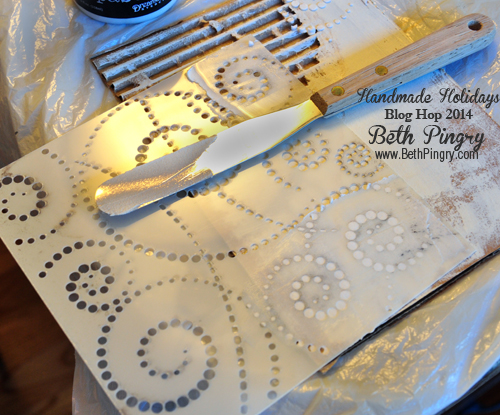
12. Add color with Gelatos, rub and wipe to desired finish and tone.
13. Apply Crafty Power Tape to the back side of the cardboard but leave the liner paper on, don’t adhere it inside the shadow yet!
Note: the above items all need some dry time, so you might want to rotate between the die cutting (below) and the painting (above) to save some time.
14. For the Picture Wheel, die cut with white cardstock, and ink to desired color with Clearsnap inks, stylus and tips. Secure to the cardboard with Crafty Power Tape.
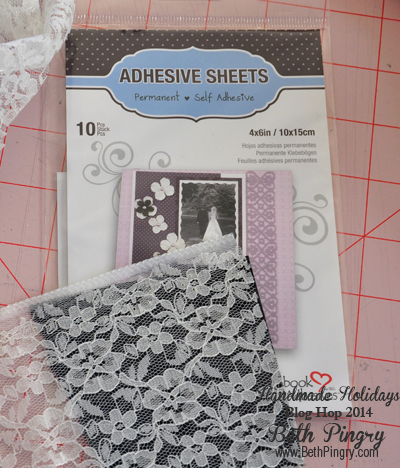
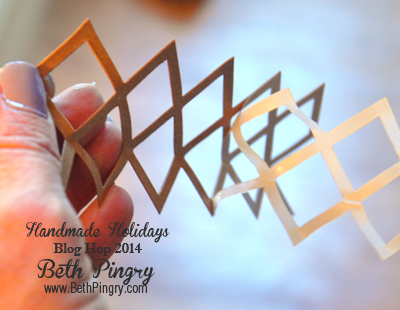
15. For the lacey die cuts, apply a 4×6” Adhesive Sheet to black cardstock. Remove the backing paper to reveal adhesive on the cardstock, cover with lace. Die cut with the Sizzix Lattice die.

16. For the Craft Foil die cuts, apply a 4×6” Adhesive Sheet to kraft cardstock. Die cut with the Lattice die. Remove the backing paper on a diamond shape.
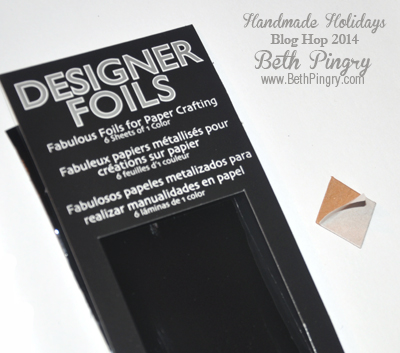
Place the Clearsnap Designer Foil shiny side up, on top of the adhesive covered shapes.
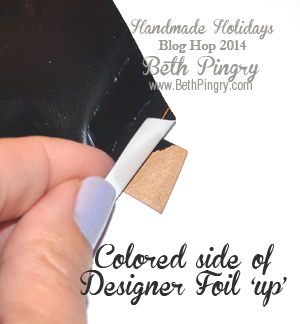
Peel off the Craft Foil piece to see that the foil is now on the die cut, and these are the other patterns that I used – all from the same Graphic 45 pad.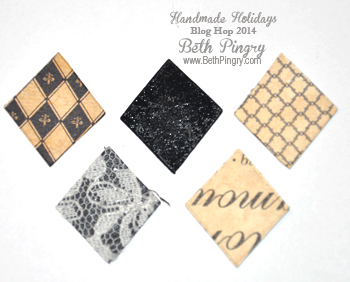
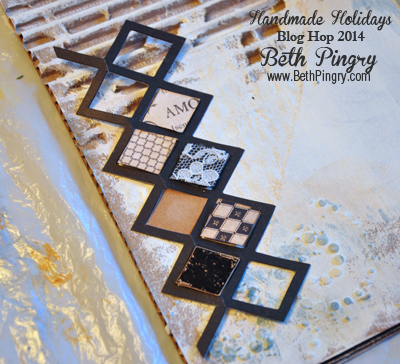
17. Die cut coordinating Graphic 45 patterned papers with Lattice die. Add 3D Foam Squares to the back side of the diamond die cuts.
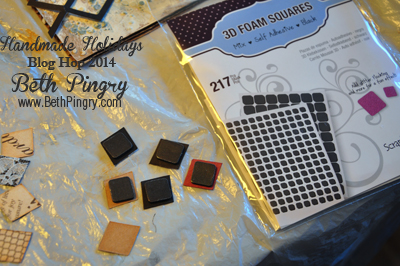
18. Using one of the Lattice die cut frames as a template, lay it on the cardboard and position and adhere a variety of the diamonds. Remove the template and discard (or save for another project).
19. From the kraft cardstock Lattice die cut with an Adhesive Sheet, remove the liner paper and adhere it so it folds to the inside of the shadow box.

20. Add a few more diamonds to the kraft die cut.
21. Adhere the Picture Wheel die cut to the cardstock so it sits behind the lady.
22. Adhere the cardboard piece to the inside of the shadowbox.
23. Remove the liner paper from the lady and adhere her to the inside of the shadow box.

Here is where I was stuck for a while…I decided I wanted flowers, but I didn’t have a Sizzix die to cut flowers (I know they have them!) So I used pre-made flowers I had on hand.
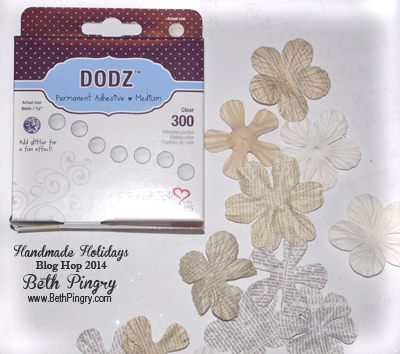
24. Create 5 flowers made from various patterns and sizes, layer and assemble with Dodz Small.
25. With 5 Dodz 3D pieces, remove the Dodz from the box liner, add Silver glitter to the tops of each, shake off excess, and add to the center of each flower.

26. Add a Dodz Small to the back side of each flower, remove the clear liner and adhere the flowers in the corners.
27. With 3D Foam Leaves, remove the liner from the desired leaf shapes while they are still in the foam sheet, (or you can remove each leaf separately) then cover the exposed adhesive with glitter. Add leaves around the flowers as desired.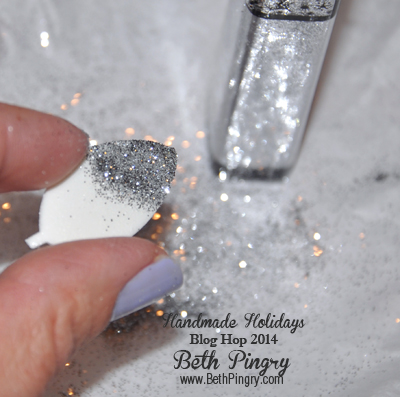
28. You can add a hanger to the back side to use as a wall hanging.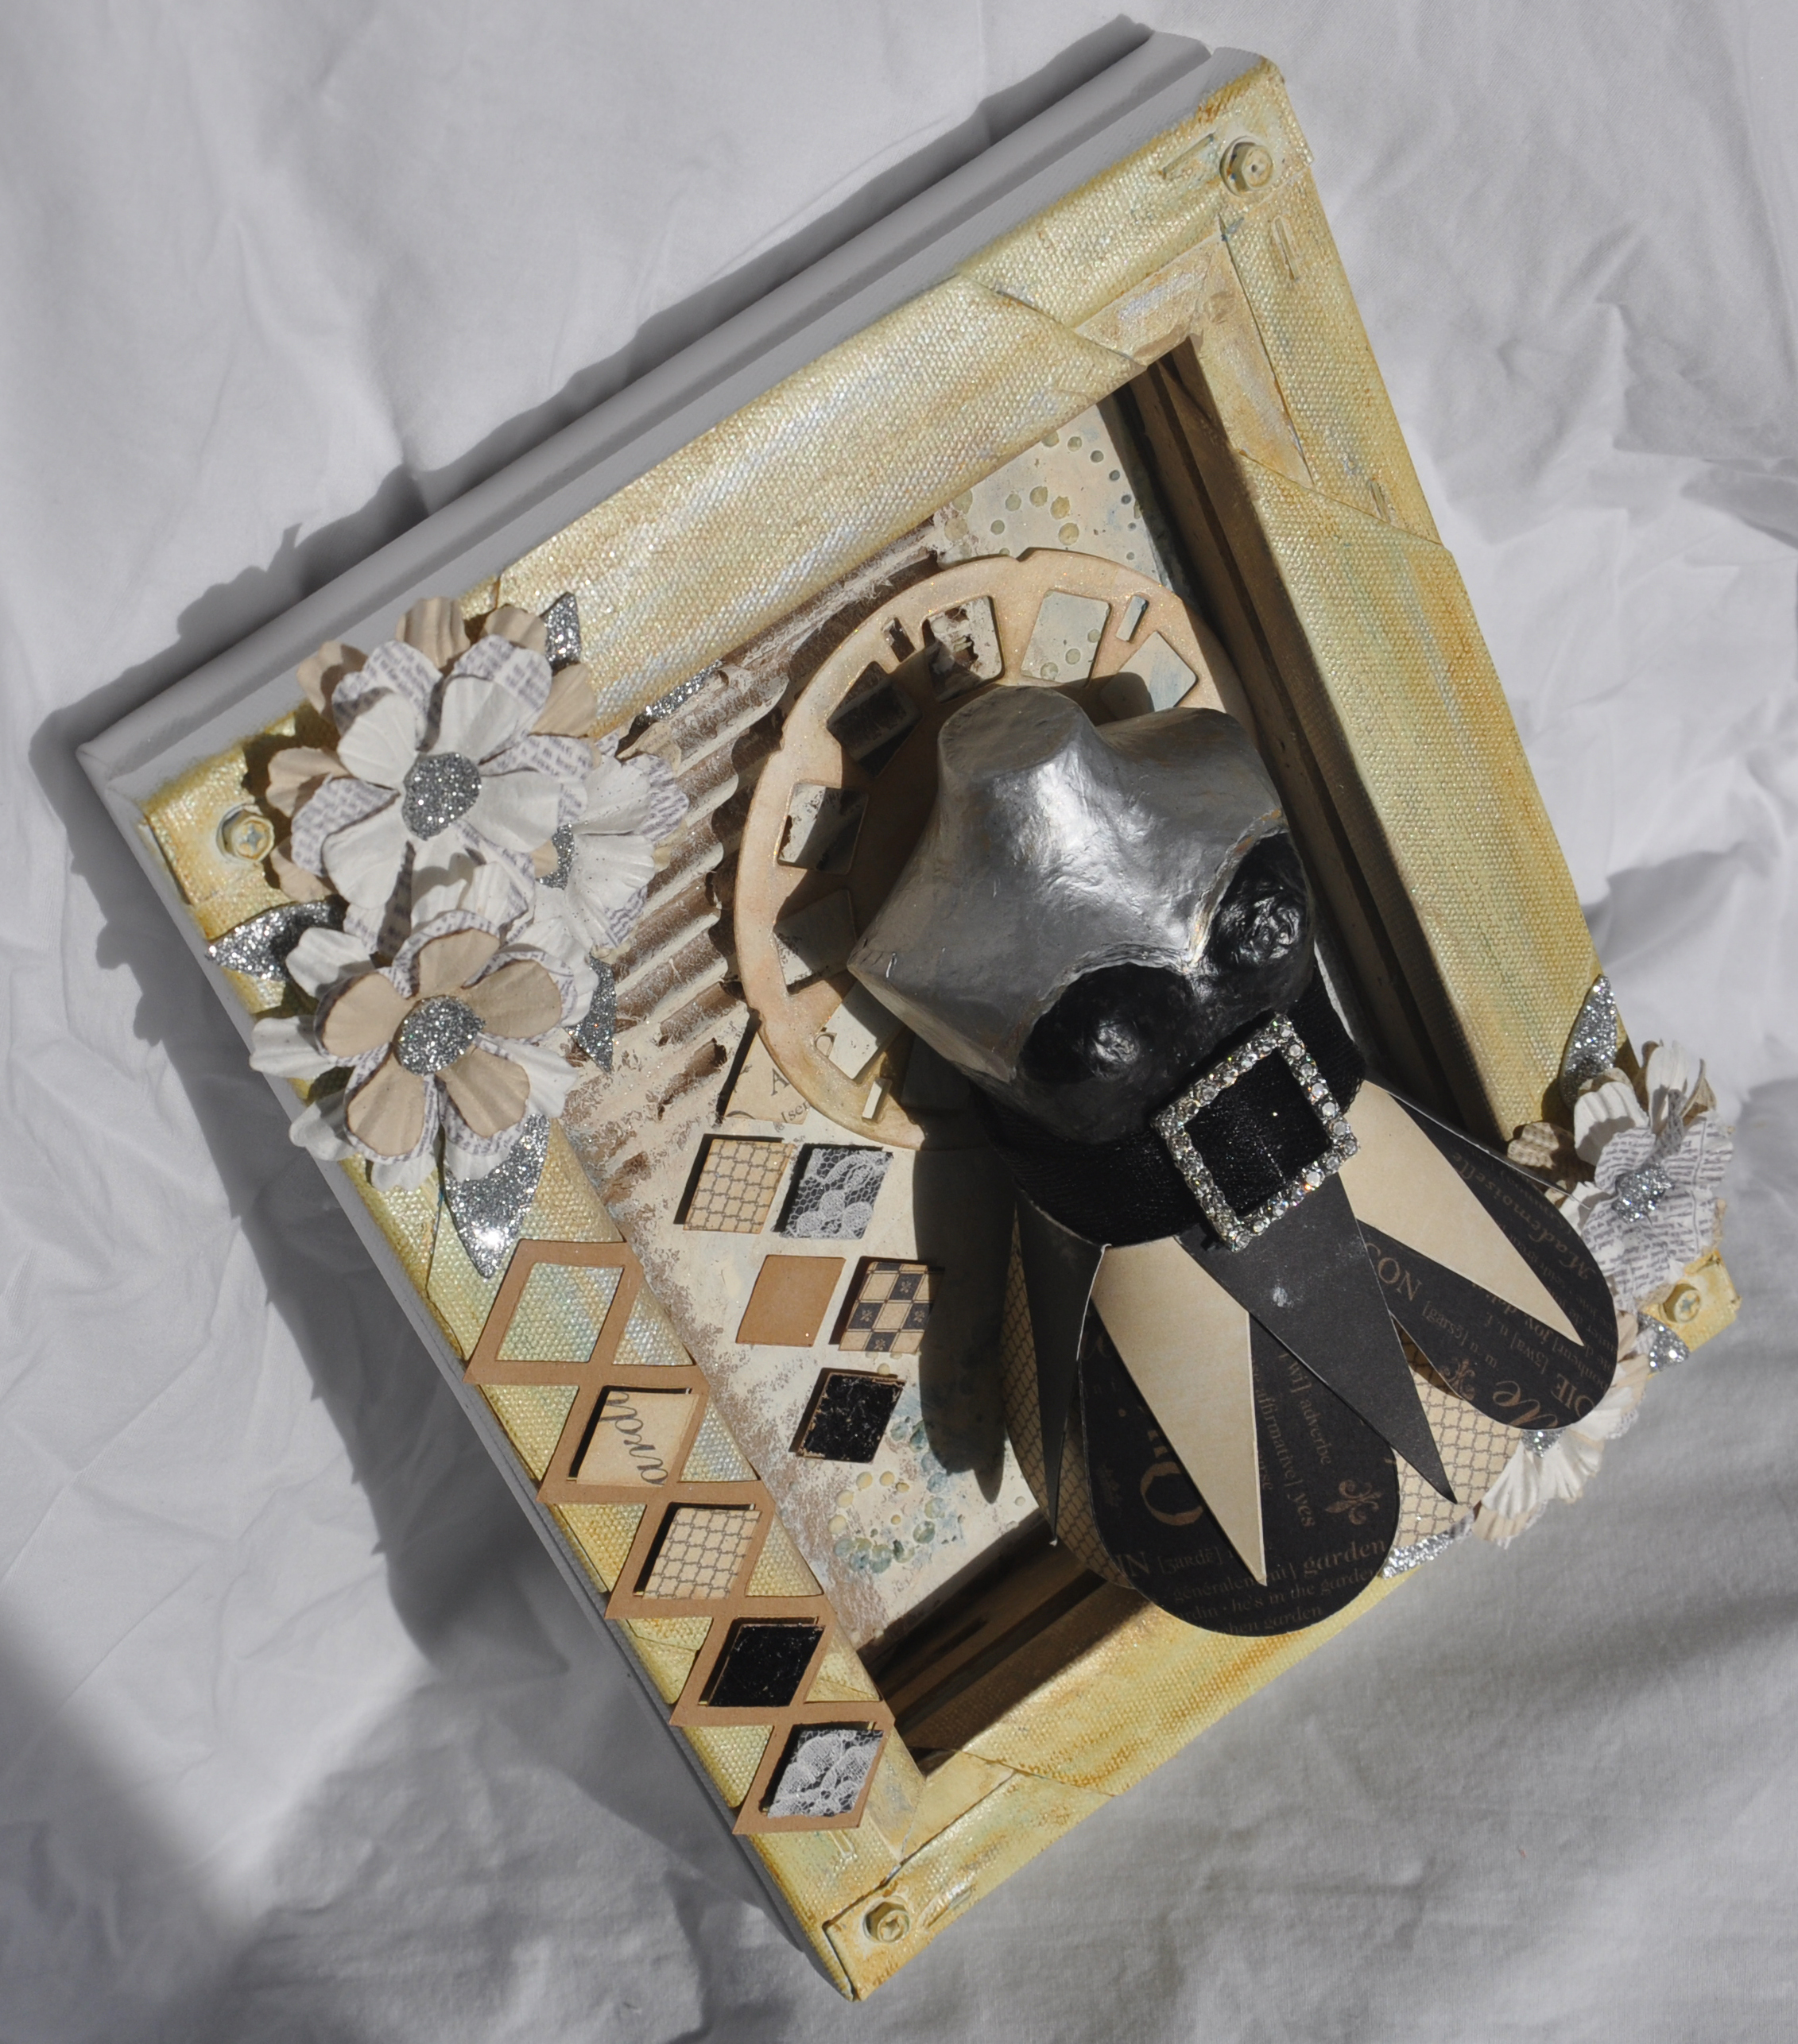
Are you ready for lots more creative handmade gift ideas and projects??
Follow along on our blog hop! Simply click on each of the links below to be taken to that post with additional information and photos on how to create a handmade gift project. Have fun and pin away!
- Clearsnap
- Ellison Educational Equipment
- Walnut Hollow
- Graphic 45
- Neat and Tangled
- Therm O Web
- Westcott
- Elizabeth Craft Designs
- Pink and Main
- The Buckle Boutique
- Scrapbook Adhesives by 3L®
- Rowland Technologies
- ICE Resin
- Hydrangea Hippo
- Clearsnap – Suzanne Austin
- Stencil1 – Ed Roth
- Graphic 45 -Nadya Lifa
- Cookies for Breakfast- Beth Pingry That’s me!
- Cupcakes and Crinoline – Mary Beth Sharkey
- Elizabeth Craft Designs – Frances Byrne
- Lazy Mom’s – Joanna Grzeszczak
- Homemade Ginger – Megan Kapple
- Scrapbook Adhesives by 3L – Asia King
- Ellison Educational Equipment – Anna-Karin Evaldsson
- One Artsy Mama- Amy Latta
- Therm O Web – Alice G0lden
- Lovely Etc – Carrie Spalding
- ICE Resin – Clare Horner
- Pink and Main – Yolie Burke
- The Buckle Boutique – Stephanie Nericcio
- Modern Surrealist – Marisa Pawelko
- A Little Craft In Your Day – Tanner Bell
- Artsy Findings – Cheryl Waters
- Stampin Mindy – Mindy Baxter
Follow our Handmade Holidays Gift Ideas Pinterest board for even more inspiration!
A huge thank you to our sponsors for this hop – please visit their blogs below and follow them. And be sure to come back tomorrow for another 30+ amazing Handmade Gift Ideas!
![]()
Clearsnap || Ellison Educational Equipment || Walnut Hollow || Graphic45 || Westcott || ICE Resin || Therm O Web || Rowland Industries || Scrapbook Adhesives by 3L® || Pink and Main || Elizabeth Craft Designs || The Buckle Boutique || Neat and Tangled
Additional Sponsorship provided to bloggers by:
Sakura || Fairfield Processing
You can find me online here:
Thank you so much for visiting!
Disclosure: I have received some product for participation in this blog hop. I am a Designer and Media Director for Scrapbook Adhesives by 3L® and receive product as part of my agreement with the company.


Beautiful creation and love those adhesive sheets and how you glittered the dots.
LikeLike
Your design looks amazing. The first time I see this kind of work. You’re very talented. Thank you.
LikeLike
Love that foil!
LikeLike
Beth!!! Just love all the little details!! BEAUTIFUL!!!
LikeLike
Wow! I never thought to use the back of the canvas to create a shadow box. My creative juices are bubbling. This is wonderful.
LikeLike
Fabulous project and wonderful step outs…hmm, maybe the next “to do” project?!
LikeLike
This is fabulous!! Love how you completely altered the canvas.
LikeLike
I love all of the details you put into this . . . the buckle from The Buckle Boutique . . . the glitter on the flowers . . . amazing work!
Shawn ~
Design Team Coordinator for The Buckle Boutique
Personal Blog ~ Crafty Chics Blog
and
MyCutSearch.com ~ Find your Cricut images FAST!
LikeLike
Your shadow box looks absolutely amazing, Beth!!!
LikeLike
Gorgeous!!!
LikeLike
Cute!
LikeLike