Tag Archives: a jillian vance design

Mini Altered Canvas – Oh Happy!

Today I’m on the blog for A Jillian Vance Design with this adorable mini canvas Oh Happy!

Beth Pingry Oh Happy mini canvas

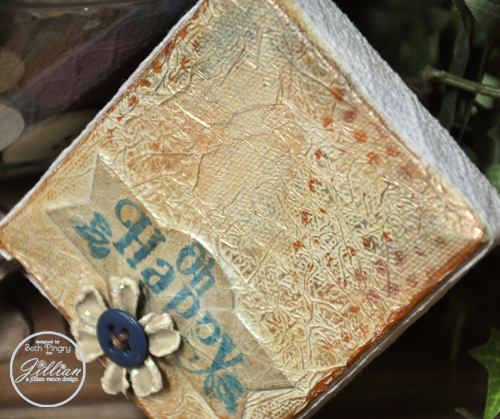
More details and quick tutorial at AJVD – where I am on the Design Team and compensated with product.  Thanks for coming by today!

Be sure to check out National Scrapbook Day at Scrapbook Adhesive by 3L® tomorrow – great giveaways going on!!

Beth

I used these supplies:

  • A Jillian Vance Design: Dainty Dots Background Builder, Charming Photos Stamp and Die set
  • Scrapbook Adhesives by 3L®: Adhesive Sheets 4 x 6″, Dodz Medium, Crafty Power Tape
  • Ranger Ink: Distress Stain (Antiqued Bronze, Brushed Pewter, Picket Fence) Pearl Paint Dabber, Archival Ink Wendy Vecchi (Coneflower Blue, Orange Blossom)
  • Prima Marketing – Flower
  • May Arts Ribbon – Lace Ribbon
  • Masters Touch – Fine Art Studio Artist Canvas 3 x 4″

Merci Tag with Texture

Hello and Happy May Day! I have a textured tag made with Adhesive Sheets, die cuts and tissue paper!

Beth Pingry Merci Tag with Texture

This is a really fun way to add texture and color to any project, check out the photos and tutorial I did for Scrapbook Adhesives by 3L® here.

These are the main supplies – see the full list at the link above

  • Scrapbook Adhesives by 3L®: Adhesive Sheets 4 x 6″, E-Z Squares®, 3D Foam Hearts, 3D Foam Butterflies
  • A Jillian Vance Design: {Die}namic Duo die, Many Thanks Stamp Set
  • May Arts Ribbon
  • Sparkle N’ Sprinkle
  • ClearSnap Ink
  • Tattered Angels
  • Silver Sharpie Pen, Black Pen, Tag

Thanks for stopping in today!

Beth

Thank U Card with Banners

Happy Friday everyone! I’ve got a Thank U card using A Jillian Vance Design stamps and dies featured on the AJVD blog.

eth Pingry - AJVD - Thank U

I used the versatile Banner {Die}tails Nested Die Set, and the fancy layer of {Die}namic Duo Die Set on top of it. I stamped ‘Thank U’ from Many Thanks to finish the design.

See where the die cuts are sort of outlined? After I die cut and embossed the papers, I sanded the embossed edges to give them more definition. Then I placed the die cut back in the die and inked around the die, adding another element of color and dimension. I inked the edges too. The top die cut was adhered with 3D Foam Squares adhesive so it has some lift.

I decided to take the photos outside in natural light, and of course I can’t go outside alone… This is the little garage sale table I use for a lot of my photos. See how helpful Cindy is!

Beth Pingry - AJVD - Thank U

Thank  you for visiting today, have a wonderful Friday and a blessed Easter!

Beth

Here are my supplies:

  • A Jillian Vance Design: Banner {Die}tails Nested Die Set, {Die}namic Duo Die Set, Many Thanks
  • Scrapbook Adhesives by 3L®: 3D Foam Squares, E-Z Runner®
  • Echo Park: All About A Boy (Adventure, Games, Brothers Chevron papers)
  • Ranger Ink: Distress Ink Wild Honey
  • Imagine Crafts/Tsukineko: Memento Tuxedo Black
  • White, kraft cardstock, sanding tool