Tag Archives: paint

Amazing Paper Grace February Die of the Month Blog Hop – Bella Diamante!

Mixed media canvas using Bella Diamante die from Amazing Paper Grace and Spellbinders, by Beth Pingry.


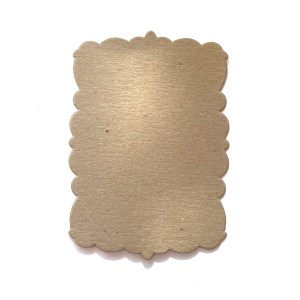
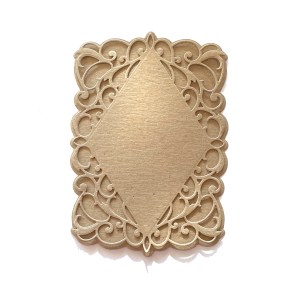
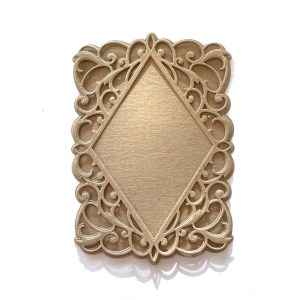
This month’s Amazing Paper Grace Die of the Month is an elegant A7 sized die with a diamond motif as a focal point.  It’s a new shape to the line-up and today I’m introducing the Amazing Paper Grace Die of the Month for February 2021, Bella Diamante.

Becca Feeken of Amazing Paper Grace sent me this die to use today.

Becca says a book cover with four elegant corners inspired her, she thought it was a dreamy and dramatic way to showcase a frame.  Bella Diamante is a 5 x 7 card front, with several element layers and rims to use as inlays.  These multiple rims and elements will allow for both A2 and A7 cards.  Elegance reigns supreme with the ability to create shaped cards,  framed cards, or simply embellish with class.

There are 7 dies included in the Bella Diamante Set

Amazing Paper Grace February 2021 Die of the Month, Bella Diamante
Amazing Paper Grace February 2021 Die of the Month ~ Bella Diamante

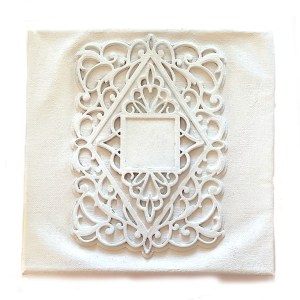
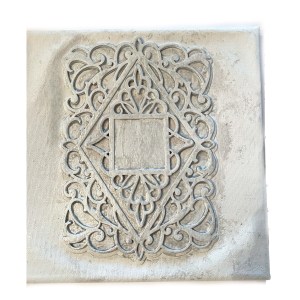
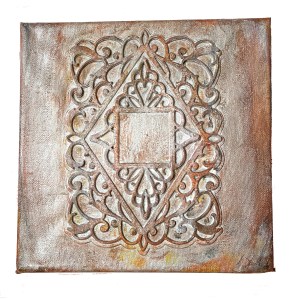
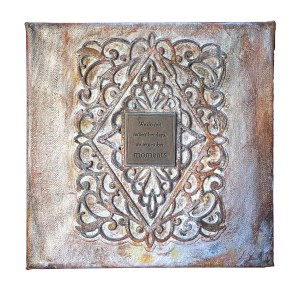
Bella Diamante Canvas

Mixed media canvas using Bella Diamante die from Amazing Paper Grace and Spellbinders, by Beth Pingry.
Close up of mixed media canvas using Bella Diamante die from Amazing Paper Grace and Spellbinders, by Beth Pingry.

I started playing with the Bella Diamante die, cutting thin chipboard with it. I envisioned a wrought iron mixed media look with texture, rust, and dimension. I layered the chipboard die cuts and then added white paint, then silver, then a combination of rusty shades, along with crackle and iridescent medium.

Here’s a quick slideshow showing how I built the layers!

Designer Tip:

Chipboard takes 2-3 cutting passes in a die cut machine. Be sure to emboss it too, that helps add more dimension to the look. Use thin chipboard and layer it for more dimension.

Bella Diamante Card

Mixed media card using Bella Diamante die from Amazing Paper Grace and Spellbinders, by Beth Pingry.
Close up of mixed media card using Bella Diamante die from Amazing Paper Grace and Spellbinders, by Beth Pingry.

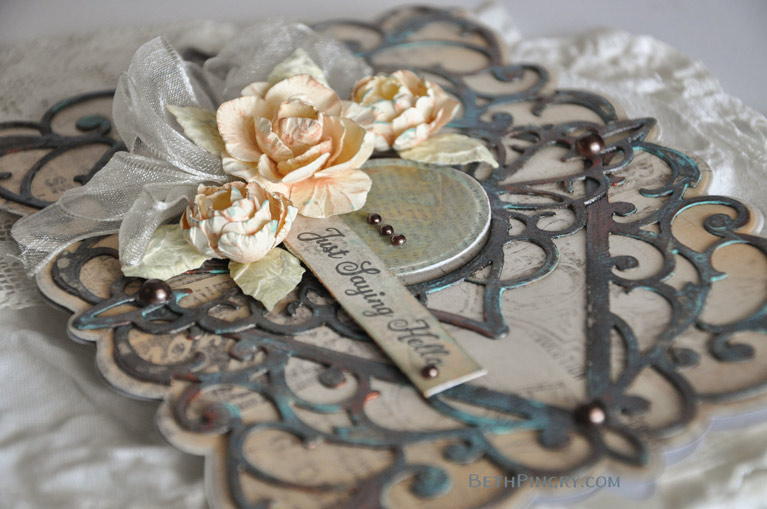
On this card, first a disclaimer: I received a prototype die set that included this circle shaped center. I didn’t realize it wasn’t part of the final die design when I made the card. You will see this center die in a future die set.

My intention on the card was again chipboard with a wrought iron look. This one started with a black base, then the teal and copper paints. I literally wiped the paints on with my finger to give it an aged look. I used an emery board to subtly sand some of the embossing and edges. The smaller flower dies are included with Bella Diamante, the center is the flower is from the Candlewick Rosebud. Visit the Facebook Group for flower tutorials!

Supplies: Canvas, ribbon, metal charm, gems, black ink, soft chalks, liquid glue, 3D Foam Squares
Paper: Chipboard, cream cardstock
Paints: White, Silver, Black, Orange, Yellow, Crackle, Iridescent, Burnt Umber, teal, copper
Dies:  Amazing Paper Grace February 2021 Die of the Month – Bella Diamante, S4-1015 Candlewick Rosebud, SDS-166 All Occasion Sentiments

For More Bella Diamante Inspiration

Visit each Creative Team blog linked below for their take on creative paper crafting ideas with Bella Diamante, the Amazing Paper Grace February 2021 Die of the Month!

Visit Elena Olinevich
Visit Nida Tanweer
Visit Tara Brown
Visit Anita Kejriwal
Visit Linda Parker
Visit Kate Skonieczna
Visit Joanna Wisniewska
Visit Beatriz Jennings
Visit Patricia Manhire
Visit Agnieszka Posluszny
Visit Beth Pingry
You are here!
Visit Becca Feeken at Amazing Paper Grace

The Amazing Paper Grace Die of the Month is available exclusively at Spellbinders Paper Arts during February, 2021. Get Bella Diamante at the special kit club price, along with other membership perks.

View this month’s Amazing Paper Grace Die of the Month video!

How would you use the Bella Diamante die? Share with me in a comment!

Follow Cookies for Breakfast on Facebook!
Follow me on Instagram!
Pin with me on Pinterest!

Follow Amazing Paper Grace On Instagram
Follow Amazing Paper Grace On Facebook
Join the Amazing Paper Grace Facebook Group
Follow Amazing Paper Grace On YouTube

Save these on Pinterest!

Mixed media card using Bella Diamante die from Amazing Paper Grace and Spellbinders, by Beth Pingry.com
Mixed media canvas using Bella Diamante die from Amazing Paper Grace and Spellbinders, by Beth Pingry.com

July 9, 2008 Spellbinders Sneak Peek!

Introducing the Daisy Border Grand, S7-003 from Spellbinders. The die cut measures 12 inches long and 2.5 inches wide at the widest part and retails for $19.99. This is a true 12 inch border and is the perfect partner to Daisy Patch Edgeability S4-043 die, both by longtime product designer Toni Kelly.

For instruction on using Spellbinders dies, I have downloaded the YouTube videos to my blog, see below, or click here to go to YouTube.

For supplies today I am using Spellbinders Premium Craft Foil, which is 12 inches wide and 36 inches long, $8.99 US retail, an awesome price! It doesn’t matter which color I use today, because I want the silver side. It comes in 5 colors plus pure copper, each color has silver on the back, except the pure copper. I used a tag from the Ribbon Tags Trio S3-150. The paper is Worldwin’s ColorMates in Deep Awesome Aqua, Deep Totally Tan, Light Heritage White, and Inkjet Printable Translucent Vellum, the Perfect Printing Pouch, photos are my own, font is Bickley Script, velvet ribbon is Basic Grey, sheer ribbon in white and yellow, and black acrylic paint. For adhesive on the metal, either a liquid glue or red line tape is preferred.

Feeding a 12 inch long die on 8.5 inch long mats is easy. Use the Spellbinders die cut sandwich, when stacked from your table up: white mat, white spacer plate, die, cut side up, material to be cut, white mat. A little tip, if you are concerned your material will move off the die, you can use a small piece of removable tape. It won’t harm the die, and it peels off the paper easily without damaging the die cut.

Feed this into your Wizard. With a 12 inch long die, part of the die will stick out the back end, and that is fine. Only the part of the die that sits on the Spacer Plate will cut, but it won’t leave a line or crease where the spacer plate ends.


After the first pass, lift the top mat, turn the border die 180 degrees so the uncut portion is on the spacer plate, replace the top mat and feed it in exactly the same way as before.

You can remove the excess cut foil from the outside of the die.

Embossing is done the same way. Leave the die cut in the die. Remove the spacer plate from the sandwich so the die sits on the bottom mat, place the tan embossing mat on top of the die, and cover with the top white mat. The tan embossing mat is 6.75 inches long and should cover half of the 12 inch border. Feed the embossing sandwich through the Wizard.

To emboss the other half, turn the die 180 degrees, cover with the Tan mat and white mat and feed sandwich again. The die will not have lines or creases or any indication that you do not have 12 inch plates.

What? You want 12 inch long plates? OK, twist my arm! They’ll be available at the 2008 Craft and Hobby Association Summer Show and at your favorite Spellbinder’s retailer in August!


Now we get to play with the die cut. Make sure that you are protecting your work surface, I use wax paper. After cutting and embossing, paint the entire die cut with black acrylic craft paint.

Paint it evenly, and be sure to get paint into all the nooks and crannies. Let it dry slightly.

Using a dry paper towel, wipe the paint off the embossed areas. Be gentle, but you don’t have to be perfect.

Do not wipe the paint out of the crevices, you want it there. You can always add more a little more paint if you took too much off. You can always take a little more off if you put too much on.

Allow the paint to dry completely, that will depend on the brand of paint you use, read the label for drying time. Cut, emboss, paint and wipe the smaller flowers in the Daisy Patch S4-043 die and one of the Ribbon Tags Trio S3-150.

I love to photograph the flowers in my yard, and I waited not so patiently for my daisies this year, they bloomed just in time to share with you! Photo editing was done with Photoshop Elements. The poem is The Daisy Field, by Ann Taylor, found on the internet.

To make this layout, I cut, embossed, painted and wiped a second daisy border. I matted the photos, arranged the borders and photos, wrapped the layout with multiple ribbons, and assembled as shown. Pull the ribbons over the tag, through the holes and attach to the back side of the page. I see this as a layout with clean lines and basic matting. The detail is in the die cuts.

Sign up for more information from Spellbinders

Thanks for stopping by!

*If you wish to be included in further communications from Spellbinders, please go to their homepage and sign up: http://www.spellbinders.us.